Shaggy Rag Rugs
Once upon a time somebody, somewhere, realised they could tear up old rags and weave the bits into a rug and people have been doing it ever since. Different people found different ways; none of them were right, and none of them were wrong. Some were more successful than others and today we have a variety of recognisable rag rug types. This page explains how to make the traditional shaggy rugs that were so popular in Britain, and the rest of Western Europe, for the hundred years or more up until the middle of the 20th century, when people preferred new-wool rugs and fitted carpets took over. There are other methods of course, but more has been written about them (especially rag ‘hooking’) so ‘Shaggy rag rugs’ sticks to shaggy rag rugs. There are different names for these rugs in different parts of the country. These include: clip mats, peg mats, proggy, clootie, proddy and rag mats or rugs. If you haven’t ever heard of any of these names your granny probably has.
Before we go any further this bit will let everyone know where they stand. You can make a shaggy rag rug with a sharp stick if you want to, but it’s a lot quicker and easier to use a purpose made tool. Just such a tool was invented by a Victorian blacksmith named Mr Brown and he seems to have done very nicely out of it for a long time, but his company stopped production sometime in the middle of the last century when rag rugs temporarily went out of fashion. Similar, but more modern, tools are now available again and I make them; so you won’t be surprised to find that, unless otherwise stated, I’ve written the whole thing assuming that everyone who reads it uses one of them. They’re now called rag ruggers, by the way. In the spirit of fairness, however, the chapter on ‘how it’s done’ also explains how to do it using home-made tools, like sharpened pegs or old button hooks. Just don’t blame me if you end up with blistered fingers and a bitter hatred for rug making.

Although a rag rug can be a pile of old cloth joined together in any way at all, there is a particular way to get the shaggy finish of the traditional ”working rug”.
Basically short strips of rag are threaded into the weave of a hessian backcloth so that both ends stick out on the same side. Traditionally, the hessian used was an old sack. Hessian sacks are now hard to come by, but ”sacking hessian”, the same material in sheet form, is still readily available ( see ”materials” ). The reason for using hessian isn’t just that it’s cheap, although that’s a good one. Sacking hessian is very loosely woven using a hard thread. The thread used is jute, and it’s well worth the effort of making a rag rug just for the chance to smell the stuff. As hessian has such a loose weave it’s easy to poke bits of cloth into it; the hard threads just move aside without breaking.
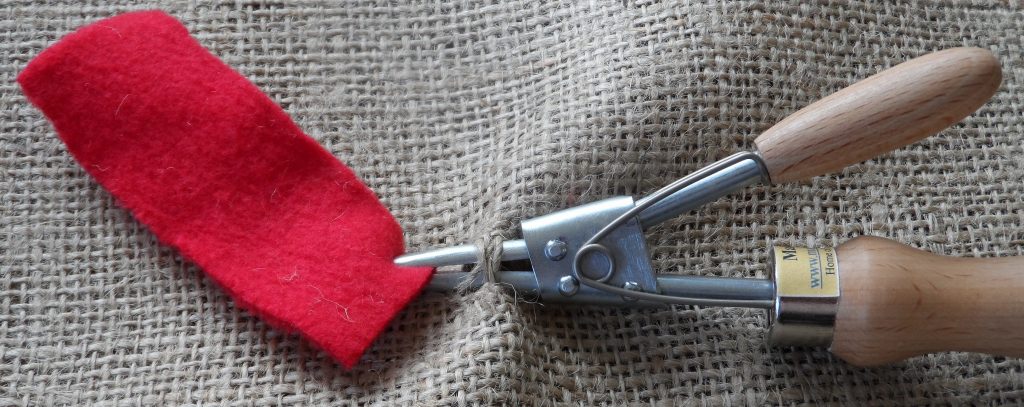
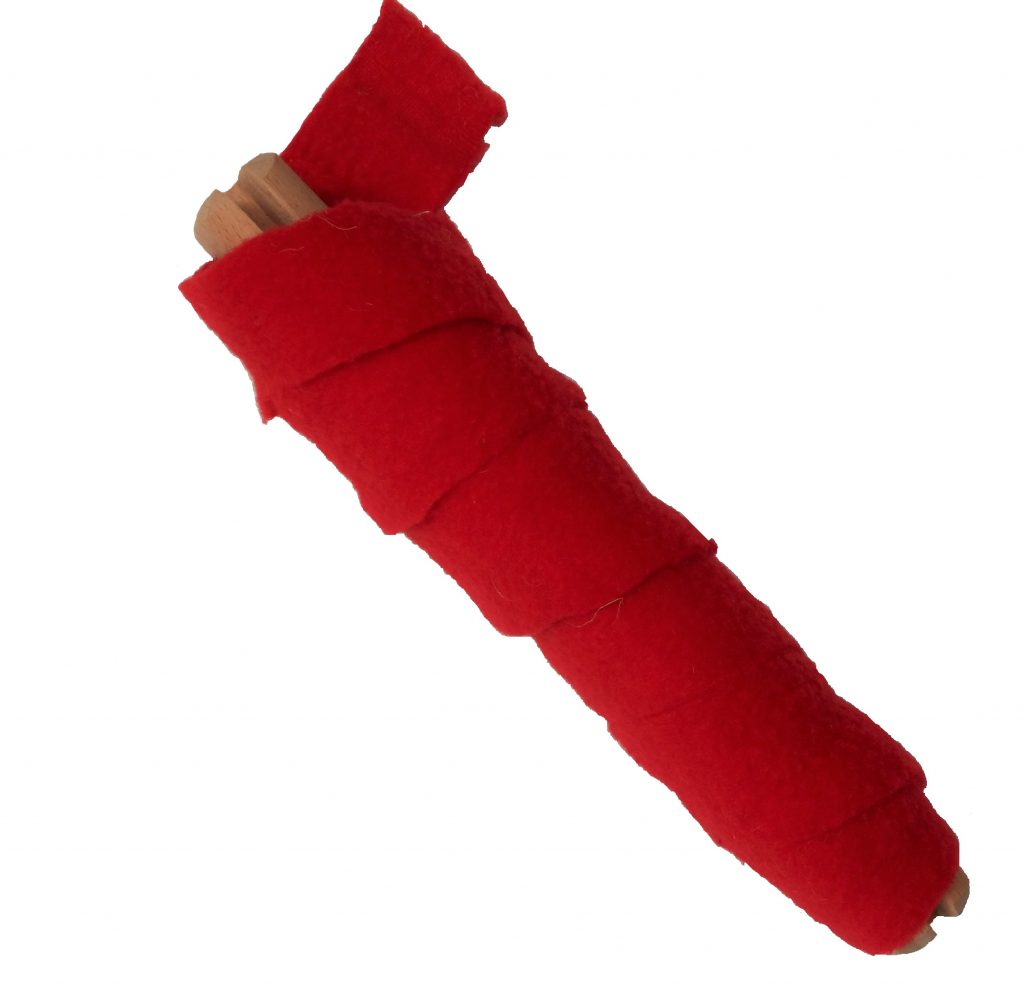
The secret of rag rug making is to fill up the hessian backcloth with bits of cloth until the slackness in the weave is taken up and all the bits are squeezed in securely. The idea is to pull a short strip of cloth through the backcloth from one side to the other and then back out again so that both ends of the strip are on one side and a squeezed up bit in the middle of the strip on the other (see picture above).
Different people prefer different sizes of cloth strips, but a good standard is about 1 inch (25mm) wide by 3 inches (75mm) long. This size is wide enough to be gripped in the backcloth and long enough to ensure a thick pile. It’s also long enough to let you put it in a bit casually; if not all the ends are exactly the same length it doesn’t show in the finished rug ( as it has such a shaggy look anyway) and the shorter ends will still be long enough not to pull out. Longer strips tend to be too long to stand up together and they flop over instead so you don’t get a deeper pile for all your extra cloth. Still, this is a free and easy craft so the measurements are just a guide.
Obviously pulling a piece of cloth is easier than pushing it, just like a piece of string. This is where the rag rugger comes in, the point is pushed under two or three strands of the backcloth so it can be used to grab the end of a cloth strip in its jaw; if it isn’t obvious, pressing the small handle towards the big one opens the jaw and releasing closes it. The strip can then be pulled into the hessian by just pulling the rugger out again. Grabbing any part along one end of the cloth strip will do but the job is easier if you grab one corner as this allows the cloth to roll up into a more streamlined shape when you pull it into the hessian.
When the strip is halfway through, just let it go; it doesn’t need to be knotted. The next piece should be pulled in not more than four or five strands, in the hessian, away from the first in any direction, using exactly the same method. As long as the backcloth eventually gets filled up with bits of cloth, so that there is virtually no slackness left in the weave, it doesn’t matter whether you work in rows or not.
This method involves using the rag rugger, or one of the old Brown’s tools if you have one, but there are other ways to do it. The wide range of names that this craft had covers most of the possibilities (names like peggers, prodders etc.).
It is possible to pull the short strips into the backcloth with a hook: you wrap the end of the strip around the hook and wriggle it through. The more common ”home-made” method, however, involves pushing the strip through, believe it or not. The backcloth was fixed tightly on a frame and each end of the short strip was poked through the backcloth with the point of a sharpened piece of wood, usually a ”dolly peg”. This gives exactly the same effect as using the rag rugger, it’s just that you work from the back. As you can imagine this pushing method is much harder and slower, but it does work.
An alternative way was to fold the backcloth and push one end of the cloth strip through the fold. In theory this should be twice as fast as working on a frame but in practise it becomes very difficult, and therefore slow, when the backcloth starts to fill up and become bulky.
Yet another method, using a peg or a hook, was to work on a frame and use long strips of cloth. With this method you push, with a peg, or pull, with a hook, long loops about one and a half inches (37mm) through the backcloth out of the long strip of rag. When you’ve finished you have a rug made of long loops. You can leave it like this but the usual thing was to cut all the loops with a pair of scissors to get the shaggy effect and stop the loops from being pulled out. This method works (if you have the patience for all the loop cutting) but it isn’t as secure as the main method because it leaves two pieces of cloth going through each hole which isn’t so secure.
The spacings for pulling in the cloth bits given here are a rough guide rather than a legal requirement. As long as the backcloth gets filled up that’s what really counts. You can soon tell if the backcloth has enough bits in it just by handling it. Before you start, the hessian is loose and floppy, when there”s enough cloth pulled into it, it becomes comparatively stiff and the strands between the cloth bits are visibly closer together. Also the individual bits of cloth are clearly squeezed tightly in the middle where they pass through the hessian. As long as you feel you’re putting enough bits in you probably are. So, if you count the strands between each bit for, say, the first dozen or so bits, and then just space them as far apart as feels right then you can relax and enjoy the craft as your rug grows.
That’s it. That’s the method. Just keep on putting bits of cloth in close together, and without knots, and you’ll find that the cloth fills up the slackness in the weave of the hessian so that all the bits are gripped so tightly they won’t come out. The closer the bits are to each other, the better, but it’s a disadvantage to put two bits in the same hole; the strands of jute in the hessian are quite coarse and grip the cloth well, two bits of cloth are likely to rub against each other more easily and therefore won’t hold it quite so well.
Having put a few pieces in to get the hang of it, with your entire rag rug making future in front of you it’s a very good time to stop and think about the philosophy of rag rug making, if that doesn’t sound too pretentious. People don’t make rag rugs as a punishment, they do it because they want to. The days when you hadn’t done the job properly unless your fingers are all bleeding have long gone.
Many people ask “where should you start?”, the answer is “where you like”. It really doesn’t matter. What does matter is that the backcloth gets filled up. It”s fine to start from one end and work along. There’s nothing wrong with doing the outside first and then filling in the middle, and it”s just as good to start in the middle and work out. If you like to work in rows it”s O.K.. And there’s no problem if you prefer to fill in some features first and do the other bits after.
One small disadvantage with working in straight rows is that this means putting all the strain on the same two or three threads all the way across the backcloth, this is easily solved by just varying the row backwards and forwards now and again, even if it’s only by one strand at a time. There’s also a small disadvantage in filling in one or more features first; as the shaggy top spreads out you can’t always tell if you’ve filled in every bit or left some bits empty. This is equally easily solved by turning the rug over and looking at the back. You’ll see any bare patches at a glance. You can tell where these are on the top by poking the point of the tool through.
The whole point of making rag rugs is to enjoy it. I if you enjoy counting strands of hessian and making sure everything is in a straight line, that”s fine. If you enjoy doing things in a more relaxed way that’s also fine, and more likely.
A quick word here about knots. Knots seem nice and secure, and if you ask a group of people who all make rugs, “who here thinks knots are absolutely essential?”, be prepared for a queue to form. Some methods of rug making do require knots, this one doesn’t. You need knots if you use strands of wool, instead of rag, because they’re less bulky, or if you use rug canvas instead of hessian for a backcloth (it’s like a fixed grid, though even with this you can avoid knots by putting in two pieces of cloth at a time). Some people do knot rag to a hessian backcloth but this is a different method where the pieces of rag are places further apart, and the result isn’t the same. With closely spaced strips of rag there just isn’t room for knots, you’d end up with a giant soft ball instead of a rug.
If anyone isn’t convinced they can visit their nearest Victorian museum as these are usually awash with hundred year old rugs without knots. I know I’m labouring the point but I’ve found not everyone is easily convinced on this point. I used to think I had the answer to this problem, which was to offer a hundred pounds to anyone who could find a knot in one of my rugs; until the day when I caught some kid trying to tie his own knot in my rug when he thought I wasn’t looking. So I don’t do that anymore. Incidentally, if you want to know how to make rugs with knots, you can find out in the ”Bits and Pieces” section.
You may have got the impression so far that the only definite rule is that the backcloth has to be filled up nice and tight. There is another one; the edge of the backcloth has to be protected from fraying. Hessian sheet is very strong but the loose weave means that it frays very easily. Therefore, it needs to be hemmed.
The best hemming method is to turn in the hem BEFORE making the rug. Then just work through both layers on the edges and the hem stays folded over nice and secure. This should be, at the absolute minimum, one inch (25mm) wide, NOT including any bits that are already fraying. A wider hem is safer, but really doesn’t need to be more than two inches (50mm). It makes life easier still to pull odd single pieces through about six inches (150mm), apart just to hold the hem in place while you work along it. These pieces can be pulled out later if they don”t match the colour scheme, or left in place. To see this in action visit us at http://youtu.be/GHayIkc2jCE.
The finished rug will be equally strong whether the hem has been turned underneath or on top, before making the rug. Turning it on top has an advantage though as the shaggy pile of cloth will hide it completely and give a neater finish.
Cutting up the cloth ready for rug making doesn”t need to be a problem, though you can make it one if you want to. There are plenty of older people who have horror stories to tell about having to cut cloth for their mothers” rug, when they were children, with only blunt scissors to cut with. One lady told me she not only had to cut out the little rectangles but also had to cut the corners off every one.
If you”d rather avoid psychological scarring in later life, however, cutting up the cloth can be quite easy. If you want to keep it really basic use cloth that can be torn in a straight line, like woven cotton or poly/cotton for instance. Then it”s really quick and easy to snip the edge with knife or scissors and tear long strips about an inch (25mm) wide. Having got long narrow strips they just need to be chopped into three inch (75mm) lengths.
You can of course do this with a ruler and scissors, but the novelty soon wears off. The easy answer is to use a cutting gauge. This is a small length of wood with a groove along one side. The circumference of this is the same as the length of strips you need, so you just wind the long torn strip around the cutting gauge (see diagram) and cut along the groove with a knife or scissors and all the bits that drop off will be the length you need.
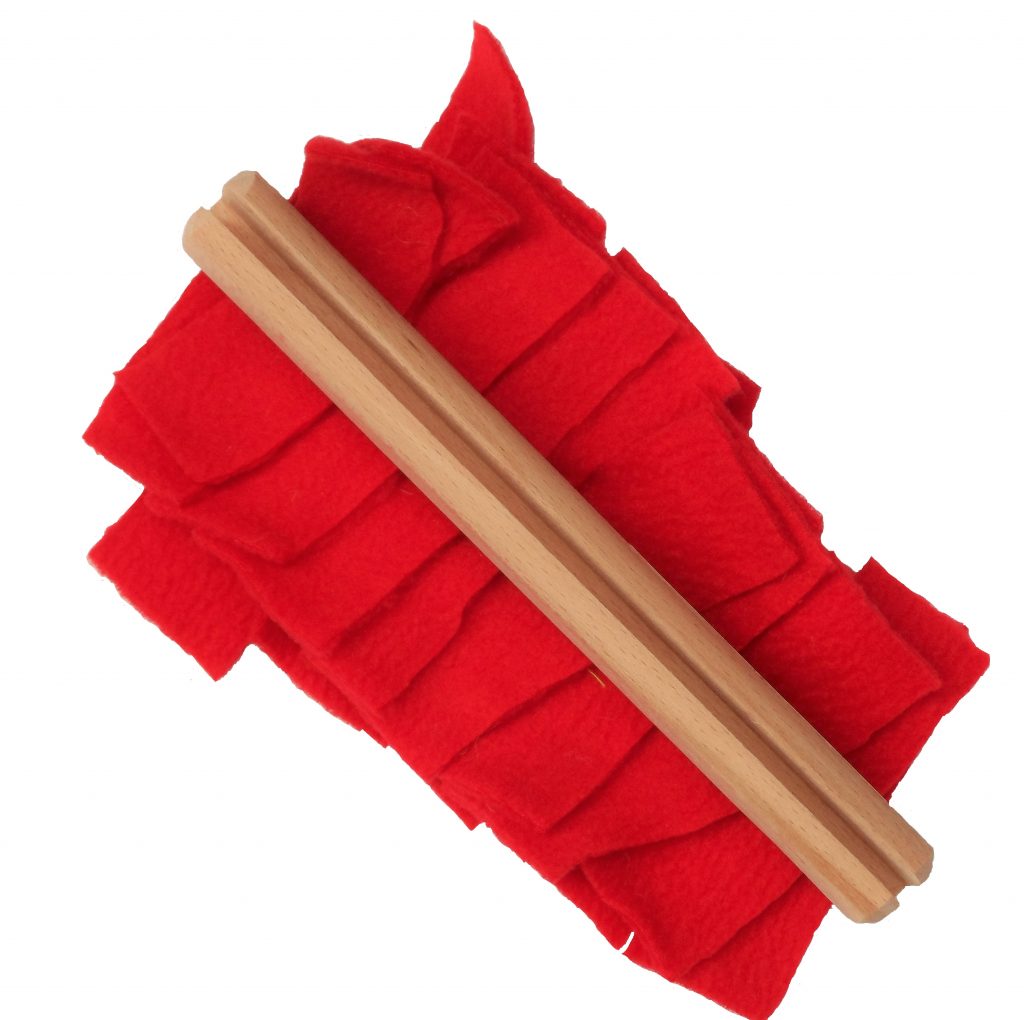
Cutting gauges are easy to come by and, as you might expect, cheap to buy. If you”ve read the ”declaration chapter” perhaps I should point out that we make cutting gauges as well. Tearing the strip the long way is, naturally, the quickest and easiest method but it only recognises them. This means that the actual layout will be simple, though it can still involve a lot of artistry.
Obviously, a picture rug will need to have the picture drawn onto the backcloth. Being a loose weave hessian is difficult to draw on but chalk works very well ( a note of caution: drawing on hessian with chalk always means also drawing on whatever is underneath it at the time). As long as the backcloth is filled up it doesn”t matter in what order the bits of cloth are put in, or what shapes they fill up but it”s worth remembering that if a line of pieces is less than two bits wide it won”t appear as a line on the finished rug. In fact three or four pieces wide would be clearer.
You may have noticed that, apart from chapter titles, I haven”t been using headings. This is probably just as well because if I had been, this bit would probably be called ” to back or not to back. That is the question”. Irritating isn”t it? The answer to the question is: ”please yourself”, because it doesn”t matter either way. The rugs with small loops DO need a backing to hide and secure all the trailing ends of the strips but the shaggy rugs don”t.
The tightly squeezed turning point of each short strip is secure enough that it can”t be pulled out without using a sharp point to dig it out with; and there are no loose ends. Traditionally, the back was left open for practical reasons. Rag rugs were made by people who couldn”t afford to buy any other sort. People who could afford to buy, especially in Victorian times, wouldn”t be seen dead with a rag rug. So, rag rugs lay on the floor of working class people who often wore work boots and probably got them dirty for a living. Also, the floor would probably be stone, slate or wood. All this means that the rug would get a lot of grit in it, apart from dust. As long as the back of the rug was left open, the rug could be hung up and beaten and the grit would fall out of the back. If the back was covered, the rug would eventually become a covered sandbag.
Another practical reason to leave the back uncovered was that the mass of little knobbly bits on the back of a shaggy rug grip extremely well on a slate or wood floor. Now of course, we all have carpets if we want them, and vacuum cleaners and washing machines, so both reasons for leaving the rug unbacked don”t really apply anymore. In fact, there can be a slight practical advantage in backing the rug because the grip that is so useful on a slate floor can be a bit aggressive on an expensive carpet. The main reason why anybody backs a rug though, is because they like the look of it. Personally, I prefer the look of a rug without a backing but I don”t expect everyone to agree with me.
If you want to back a rug, it”s quite easy. All you have to do is to sew a piece of cloth, or hessian, over the back, having turned the hems in first so that they are on the side nearest the rug. You can also sew lines across the backing in a grid to give a quilted look but you don”t have to as the rug will be solid enough to keep the cloth reasonably tight. Another method is just as easy and only a bit messier. This is to paint the back with P.V.A. glue. If it”s put on in several layers it can become quite thick without it all oozing through into the pile. The glue has to dry between layers. This method has the advantage of waterproofing the back of the rug which can be useful if it”s on a floor that gets wet, though obviously the pile can”t be allowed to stay wet because it will rot.
The final job in rag rug making is to take the completed rug outside and go over it with a stiff brush to remove any lose threads. There will, inevitably, be more coming to the surface when the rug is actually used ( or even when passed round for people to admire), but a regular brushing, or vacuuming, will soon sort these out. The cloth bits will stop shedding when the loosely attached strands have gone, which doesn”t take long.
By far the easiest design ( though it”s amazingly effective to look at ) is completely random. You just take all the material that you”re going to use ( for a guide see ”materials” ) cut it up ready, put it all into a box or bag, stir it up and then take out each piece to put it in the rug without looking. Provided that you”ve picked colours that go together all right your rug will be really attractive on the strength of its shaggy look and mixed colours with hardly any planning at all. It doesn”t matter if you use patterned cloth, as soon as it”s cut up and pulled into the rug the pattern will be completely lost; but it can make a very nice dappled or ”salt and pepper” effect.
Probably the most common of the traditional designs is mostly random. When people made rag rugs because they needed a rug but couldn”t afford to buy one, they used whatever cloth they had available. Mixing colours at random made a bright spot to put on the floor out of what might otherwise have been a bit of a dog”s breakfast. I say ”mostly random” because it was usual to have a plain, generally darker colour, border about four pieces of cloth wide. This provides the effect of a frame and looks pretty good.
If there was enough of the dark cloth most people seemed to like to put a diamond shape in the middle to match the border. This gives a rug a little more of a ”designed” look and there”s a very handy trick to help do it. You don”t need to draw the diamond on the backcloth. First you fold the hessian in half and then fold it in half the other way, again so that the folds mark out four segments. This finds the middle where you start the diamond. Then you put an equal number of pieces either side of the centre point in a straight line across the middle, the shortest way. The length of this line (which is your choice), will be the widest part of the diamond. Having done this line, you just fill in rows either side of it with one piece of cloth less at each end of every row. By the time you get down to one piece on either side, you have a well-formed and symmetrical diamond.
There are varying traditional designs in different parts of the country ”though most seem to be based on the ”frame and diamond” idea, with the main difference being the style and colour of material used. This was generally governed by local industries: sailors used scraps of sails, miners used worn out work clothes stained by whatever they mined etc.
There is one startlingly different design though, the tortoiseshell which seems to have come from the north of England. This was made by using short, narrow bands ( two or three, perhaps four, pieces of cloth wide), of contrasting colours. Dark colours against red or orange were popular. The result is really eye-catching.
It”s always nice to make a personal design; something that means something to you. Obviously, this could involve a picture of almost anything but a much easier way to make a rug special is to use cloth from clothes that have been worn by friends and family. A ”heritage” rug like this doesn”t need to have names written on it or anything, if it”s possible to see bits of familiar clothes.
In case you haven”t read the ”How it”s done” chapter, it”s vitally important to remember that shaggy rag rugs can be made with a recognisable picture but only if the subject is obvious. The deep pile is wonderfully soft but the ends of cloth sticking out are roughly one and a quarter inches (31 mm) long and they will inevitably move around amongst each other, lines or bits of colour won”t be distinguishable as complete lines or chunks unless they are at least two pieces of cloth wide, and preferably wider.
To give you an idea of how it works: one piece of cloth of a different colour from the rest will have two ends close to each other and both will move a bit every time they”re stepped on. A patch of half a dozen or more pieces, however, will have a centre that stays the same colour even if the edges do blend in with the surrounding colours..
There are a couple of ways to increase the clarity of a picture on a rug, but a thick soft thing that you walk on is never going to be as detailed as a tapestry. One helpful method is downright cheating but don”t worry, no-one will know. This involves threading a long strip of cloth or a length of chunky string into the backcloth around the edge of a patch of colour to help to separate it from the surrounding bits. You can do this with a wool or elastic needle or use the rugger to pull it through a stitch at a time, either way it”s quick and easy. It helps keep colours apart quite a lot, but it won”t separate them completely.
Another method leads to a very different principle of design, it is to make a relief rag rug ( a new use for the phrase ”Three R”s” )which can also be a tactile picture. This idea is to use different types of cloth for different colours, and sometimes even different lengths of strip. Before you get carried away here it”s not practical to make steps in a rag rug, the material is too soft, but you can help to emphasise borders between colours.
Tactile patterns have the added advantage that people with impaired sight can appreciate the picture by touch. It seems to be a natural reaction for anyone admiring a shaggy rag rug to stroke it regardless of how well they can see. A good example of a tactile picture is a tree on a hill. The whole thing has to be as obvious as a picture in a book for small children but it works. The hill can be a medium weight cloth, green of course, the brown tree trunk very heavy cloth, the rest of the tree a blob of the same material as the hill and the rest being very thin blue cloth for the sky. You can feel this picture as well as see it, and it doesn”t take a lot of planning.
Using different lengths of cloth isn”t quite so straightforward. For one thing, longer strips of cloth won”t stand up any higher, they”ll just lie on top of each other and make the rug a bit thicker. Shorter strips will help to emphasise a contrast area if the cloth used is different from the surrounding areas. If it”s the same cloth having shorter lengths will hardly make a noticeable difference at all. A good example of this method is a pair of eyes in a face (an obvious face rather than a portrait). If the face itself is made from reasonably thin cloth the eyes can be made from shorter pieces of thicker cloth, in a different colour of course. Contrary to what you might expect, the eyes don”t look sunken but they do look more clearly defined.
The shorter pieces don”t need to be made much shorter, half an inch (1 2mm) will do. If you use a cutting gauge, as described in ” How it”s done”, it”s easy to cheat without getting a different sized one. Provided the rest of the rug is made from material that isn”t stretchy you can make your shorter pieces by choosing a cloth that is stretchy, and thicker than the rest of the rug. This will stretch when you wind it around the cutting gauge and spring back when you cut it, about the required half inch.
Incidentally, if you want longer strips to come off the cutting gauge lay a pencil along it before winding the strip of cloth around, and the cut bits will be about half an inch (12mm) longer.
One more thing to say about using different thicknesses of cloth, and to some extent different lengths of strip, is a slight warning that patches of one kind next to another is fine but widely different pieces inserted at random might not be so secure.
Some people like to make rag rugs using more than one method. The shaggy pile produces the deepest pile of all, as far as I know, which makes it an ideal method for bordering rag rugs of any type, because it gives the effect of a frame.
Rag rugs can be made from virtually any textile material and quite a few non-textile ones as well. If it”s flexible enough to pull into a hessian backcloth and it can be cut into short strips its O.K..
The backcloth is almost always hessian for the reasons given in ”How it”s done”, but some people do prefer rug canvas. Also, there”s always someone who finds an alternative. I”ve heard of the plastic string bags that greengrocers get being used and apparently people in the Caribbean make do with woven fibreglass sacks which are readily available there. The lady who told me about it didn”t know how the rug makers avoided taking all the skin off their fingers although I suppose they probably handle the rug by grabbing the pile rather than the backcloth whenever they can.
The hessian usually used is called ”sacking hessian”, and it is the same material that sacks were made of but now it”s easier to find it on a roll. Handicraft shops nearly always stock it and so do many haberdashers and drapers but you”ll probably have to ask for it; being cheap it”s usually stuck in a corner or behind something else with a better profit when it sells. Other places to get it include upholsterers” suppliers, farmers” merchants, builders” merchants and garden centres. There is a list of suppliers at the end of this book.
There are other grades of hessian available; all have a tighter weave usually sold according to the number of strands per inch, and all cost more to buy. For this particular method of rug making the finer grades of hessian don”t have any particular advantage and are harder to work on.
The cloth for a rug can be anything, but a bit of common sense narrows the field down and makes choosing easier. Old clothes have a lot going for them, not least of which is that they”re cheap or even free. Charity shops and jumble sales always have supplies of donated clothes that nobody wants to buy. These usually get sent off as rags for paper making. Rug makers can usually get all the cloth they want for a small donation.
Off-cuts are a little more expensive but, being rectangular and not having pockets etc., are quicker to cut or tear into bits. There”s no reason not to buy cloth at any price; many enthusiasts buy plain material and then dye to their desired colour. Its personal choice again, you can spend as much or as little as you want. Just because Victorian housewives used their husband”s worn out work clothes (sometimes dyed with carrot peelings, onions, tea etc., to be especially flamboyant) doesn”t mean you have to.
As mentioned in ” How it”s done”, woven cloth that can be torn is easy to use but any cloth can be used as long as you”re prepared or equipped to cut it up. Hand knitted wool can be used if it is boiled, before it”s cut up, as this felts it. One material that might be a problem is silk. I don”t know of anyone who has tried it but being so fine and slippery it probably wouldn”t be secure enough. To be frank, silk is too expensive to tear up for rugs anyway.
If you”re making, or choosing, a rug for a particular place then a bit of common sense can make a big difference. For instance if a rug is to be washed it needs to be made from washable cloth. If a rug is to be placed in front of an open fire, natural fibres are safer; they still burn if something hot drops on them but don”t give off the same noxious fumes that man-made materials do. Alternatively a rag rug that”s going to be used in a bathroom is inevitably going to get wet and needs to be dried. In this case man-made fibres come into their own.
The thickness of the material you choose to use doesn”t matter at all. Most old rugs ( especially surviving Victorian ones) seem to be made out of thick cloth. This is probably because hard up Victorian people had other uses for any scrap thin cloth they might have had. Even so there seems to be an opinion floating about that ” you have to use thick cloth to make your rug last”. If you want to use thin cloth ”though, and I often do, you just put the bits in a bit closer together. When you finish there”s just as much cloth in the rug and if you live long enough to wear it out you”ll be having the last laugh anyway.
One last thing about materials is a question that I can”t answer. The question is ” How much cloth will it take?. The problem with answering this is that no two people will use exactly the same amount. As the craft is very relaxed and there”s no rigid formula for how close the pieces of cloth go to each other some people will inevitably use more than others. The only way to find out how much cloth you will use is to measure a sample of cloth (say, one shirt or something like that) and put it all into a sample piece of rug, so that you can get your own personal guide of how much to use. Even when you know this it pays to make sure that you have a reserve (say 10%) of cloth if you want to keep to a particular colour scheme or pattern because the amount you use will vary and you can bet your life that the amount will increase directly in proportion to the smallness of your reserve.
Rug Care
Rag rugs aren”t a problem to look after. They were, after all, developed as a practical way to cover and brighten the floors of working people.
They withstood work-boots, children, pets and no doubt vermin too; all this and with a stone or wood floor underneath. There were a couple of hazards for rag rugs; fire and flood, but the thing that finished off most was the dreadful fate that awaits us all: going out of fashion.
Fire and flood don”t have to be major disasters, like the house burning down or a river taking a detour through it. Rugs are far more likely to suffer from having cinders fall on them if they”re laid in front of a fireplace, or to get partly wet from spillages and flooding washing machines in kitchens. Everyday problems like these are easy to deal with.
To give you an idea of how hard-wearing rag rugs are it seems it used to be the custom for a family to make one new rag rug a year. This was in the days when it was done with sharpened pegs and was usually a chore for children to do. The new rug would be put in the front room, probably by the fire, and the one it replaced would go into the living room. The one that was already there would be put in the kitchen and that one into a bedroom, and so on round the house. When the rug had been in every room it would, having spent a year in each, be put by the back door for people to wipe their boots and shoes on, for another year and finally it would end up on the compost heap. Not an easy thing to finish off.
On the way around the house the rug might well have to repaired if it suffered accidental damage. The cloth pile is so thick it can take no end of accidents before it really begins to matter, but the hessian backcloth being just one layer is more likely to need repair.
Burns are easily dealt with. Although shaggy rag rugs are very strong and the pieces of cloth are held securely it is possible to pull them out by grabbing one piece at a time and pulling them in the right direction (this is something that no cat has yet learned to do !). If a rug has a minor burn, therefore, it”s straight forward to remove the affected pieces and replace them one by one. It”s a good idea when making a ”working rug” to keep spare some of the material. If the burn is serious enough to have gone right through the rug (which a dropped red hot cinder might do) then it will need a patch on the backcloth. To do this remove bits of cloth around the burn hole until you”ve cleared an area of sound hessian all around it, about two inches (50mm) wide. Then lay a spare piece of hessian over the hole (under will do but over is neater) and the cleared area and pull in new pieces of cloth (and any salvageable ones that you”ve removed) over the whole area. The rug will be virtually as strong as new and I would defy Sherlock Holmes to spot the repair: as long as you match the colours properly of course.
Wetness doesn”t harm a rag rug at all, it”s being allowed to stay wet that”s the problem. The cloth pile will eventually rot but the hessian backcloth is where the damage will be done first. The jute it”s made from is prone to rot, when wet, anyway and there”s only one layer of it; and it”s under strain from all the bits of cloth pulled into its weave.
Obvious minor disasters are hardly a problem at all, if the washing machine pours water all over the kitchen floor and soaks your rag rug, you”re bound to notice. All you have to do is dry it out and there”s no harm done. If the rug gets a bit damp at the bottom and no-one notices, however, the backcloth may start to rot. If this happens then it has to be repaired in the same way as a burn hole. This may sound a bit dire but it”s not worth laying awake at night worrying about it; in a modern heated house most accidental spillage”s and so on will dry out long before a rug starts to rot anyway.
Having found you can keep your rug in one piece you”ll probably want to keep it clean as well. Unlike your ancestors you have options. Rag rugs can happily be hoovered, machine washed and tumble-dried. This is, of course, providing it”s made from machine washable cloth and it doesn”t have previously unwashed cloth of colours that are likely to run into each other. The traditional method of cleaning was harder work, the rug had to be shaken or hung up and beaten. This was also less effective than modern methods and rag rugs were sometimes known as ”dust traps”,. The idea that rag rugs extract all the dust from a room and therefore keep the rest of it clean seems to have been based on mindless optimism though.
Bits and Pieces
Tying Knots
Although the most likely material to use is wool, other materials (in strands) can be used instead. This method requires a rug canvas for backing and each wool length has to be knotted. As the rugger grips the wool the knot is tied and tightened in one movement. Turkey rug wool is most suitable and can be bought in whole or ready cut lengths. Place a length of wool parallel with a strand of canvas base. Push the rugger over the wool and under one strand then over the next strand. Pull one end of wool over the rugger to meet the other and place both in the rugger jaw. Pull rugger back to from a knot and release when the knot is tight.
The distance between the knots depends on the thickness of material used and is easily judged over a small area. The lengths used need to be a little longer than usual to allow for the knot (about two and a half inches, 12mm). This method can be used on a hessian backcloth but it is much better suited to a rug canvas.
Joining
Rag rugs are usually made on a single piece of hessian backcloth but sometimes there”s a need to join pieces together. This might be if several people are contributing to one rug or if one person is making a very big rug and doesn”t want to keep on hauling the thing about; you can carpet a whole room if you want to – it”s been done. Joining two bits of backcloth is as easy as turning the hem, you just overlap the two pieces (without hems) and work through both. The overlap ought to be four inches (100mm) for safety, if you trim off any straggling threads of the hessian afterwards the join won”t show on either side.
Uses
No doubt you can think of plenty of ways to use a rag rug for yourself but there”s one really handy use that”s not immediately obvious. Rag rugs are very thick and bulky but flexible enough to mould to the shape of the floor underneath. If you put one on an uneven bit of floor it will cover it up safely and effectively without harming the rug at all.
Rag rugs make extremely good presents, not only because there”s something special about giving something you”ve made yourself but you can also use material that is particular to yourself or the person getting the present. In the ”good old days” of the depression rag rugs were often given as wedding presents.
Miniatures
This type of rag rug making doesn”t work very well for miniatures, dolls house size. Rag rugs do seem to be very popular in dolls houses but reducing the size to one sixteenth or one twenty-fourth is asking a lot of the hessian which is then far too thick. The answer seems to be to use ”punchcraft” instead even though the effect isn”t the same. This style of rug making doesn”t work using thinner material as a backcloth as the threads in it break rather than move aside.
Pricing
There is a market for rag rugs now that we can all afford not to need them. Ironically these rugs that better-off Victorians wouldn”t dream of having because they were associated with poor people, are now quite valuable. Almost all the cost of a rag rug is the time it takes to make it. Most people who make rugs to sell prefer to make them to commission, but this requires coming up with a price. The cost of the materials is easy enough to work out, the time is a bit harder. As a guide a realistic working rate is six square inches ( 1 50mm) an hour; or, if you prefer, one square foot in four hours. This includes cutting up the cloth. Pricing rag rugs by the square foot is quite normal proving rag rug makers to be much more down to earth than painters.
Wool
An alternative way of using wool is to use natural, unwashed fleece. This splits up into little ”chunks” about as thick as a little finger. When the rug is full it can be brushed, or curry combed, and then washed. The result is something like vegetarian sheepskin. Using different fleece colours will make a permanent pattern. The main disadvantage is that handling unwashed fleece makes your hands smell like a sheep.
Published by Makings Handicrafts October 1997