Making a rag rug using a hook is probably the best known method. The idea found it’s way to the USA where it’s become popular enough to attract commercial interest and it’s come back, to Europe, with the benefit of professional promotion. American rugs tend to be worked on a very fine scale (often working with strips of cloth 1.5mm wide) which can produce wonderfully detailed patterns but requires specialist equipment; mainly to cut up the cloth.
Most British rug makers prefer to use a wider strip (12mm to 20mm, depending on the thickness of the cloth) and make a less detailed pattern sometimes called “primitive” (cheek!). The basic techniques are the same but with wider strips it’s practical to get away without buying all the gear or having to be fussy about what sort of cloth to use.
The technique involves holding a long strip of cloth underneath a hessian backcloth; poking a small hook through the backcloth, working from top to bottom, and pulling a loop of the strip back up through. Then another loop is pulled up – a couple of strands, in the backcloth, away and so on until the backcloth is full. The very detailed rugs have a loop pulled into every hole and the backcloth is a fine evenweave hessian. The hem of the backcloth has to be sewn up, underneath, afterwards and a backing sewn on to cover the ends of the strips.
Hooked rugs are often made with the backcloth stretched tightly on a frame, which many people find easier as both hands are occupied, but it’s not essential. The same result can be achieved by pushing loops, from a long strip of cloth, through (from bottom to top) with a point; sharpened dolly pegs used to be the favourite in the crafts heyday. Hooking is easier, though, especially as working on top lets you see the pattern better. It’s not unknown for people to pull quite long loops through and then cut them, with scissors, to achieve the same appearance as the shaggy rugs made with the rugger this doesn’t work so well, though, as it leaves two short strips of cloth in the same hole; unless it’s the right texture the bits will be liable to slide against each other and come out.
Finally, it might interest you to know that people who make rag rugs using a hook usually refer to themselves as “hookers”. You can probably think of a whole selection of jokes based on this one fact but, rest assured, it’s extremely unlikely that you’ll come up with a new one!
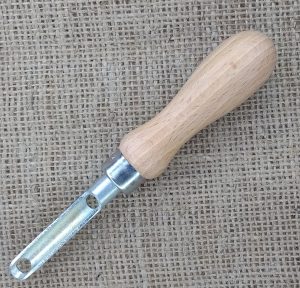
Rag rug hook instructions
This tool is for making hooked rag rugs by pulling loops of cloth into a hessian backcloth.
How to use the hook
First cut, or tear, the cloth you intend to use into strips about 12mm to 25mm [½” to 1”] wide. Cut it narrow if it’s a thick cloth, like woven wool or wide if it’s a thin cloth, like light cotton.
To fix it in the hessian backcloth first push the hook through the backcloth working from top to bottom; wrap the strip of cloth, near one end of it, over the hook [fig 1] and pull a loop up through the backcloth so that it’s left standing proud on the top side [fig2].
Fig 1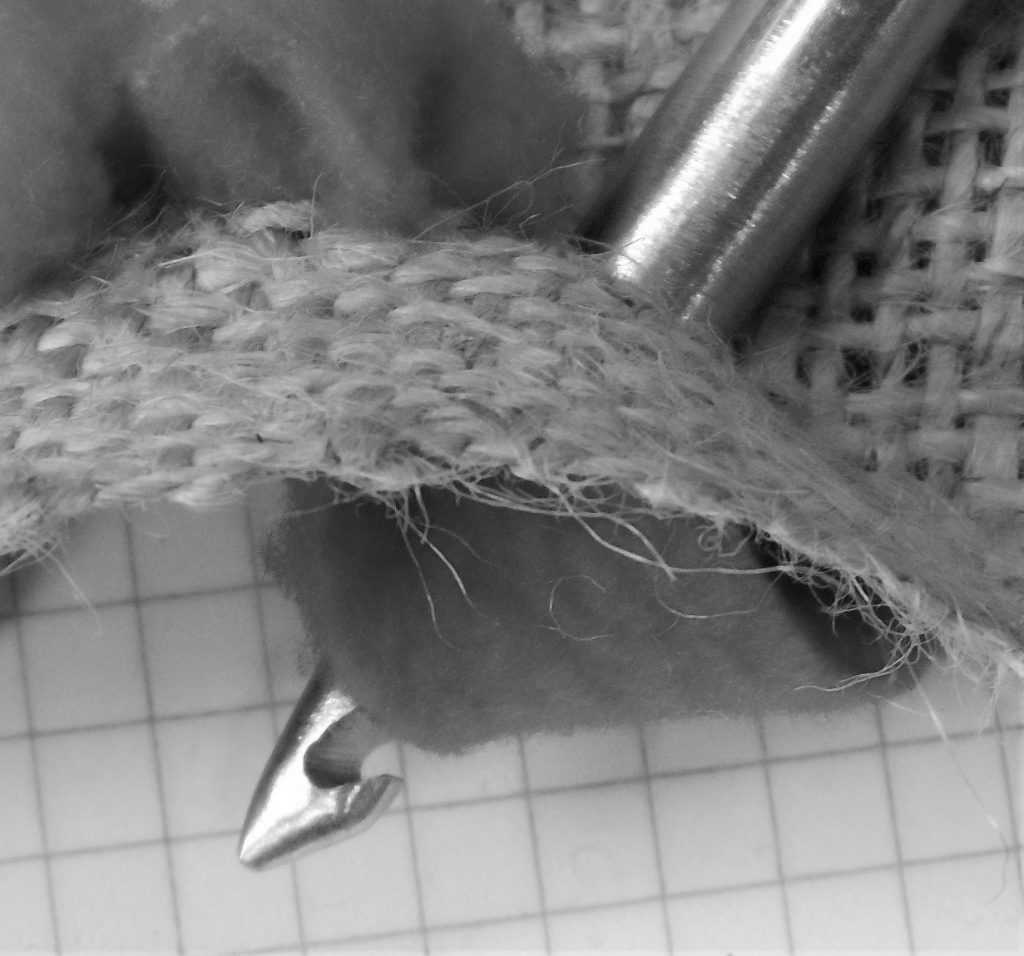
Fig 2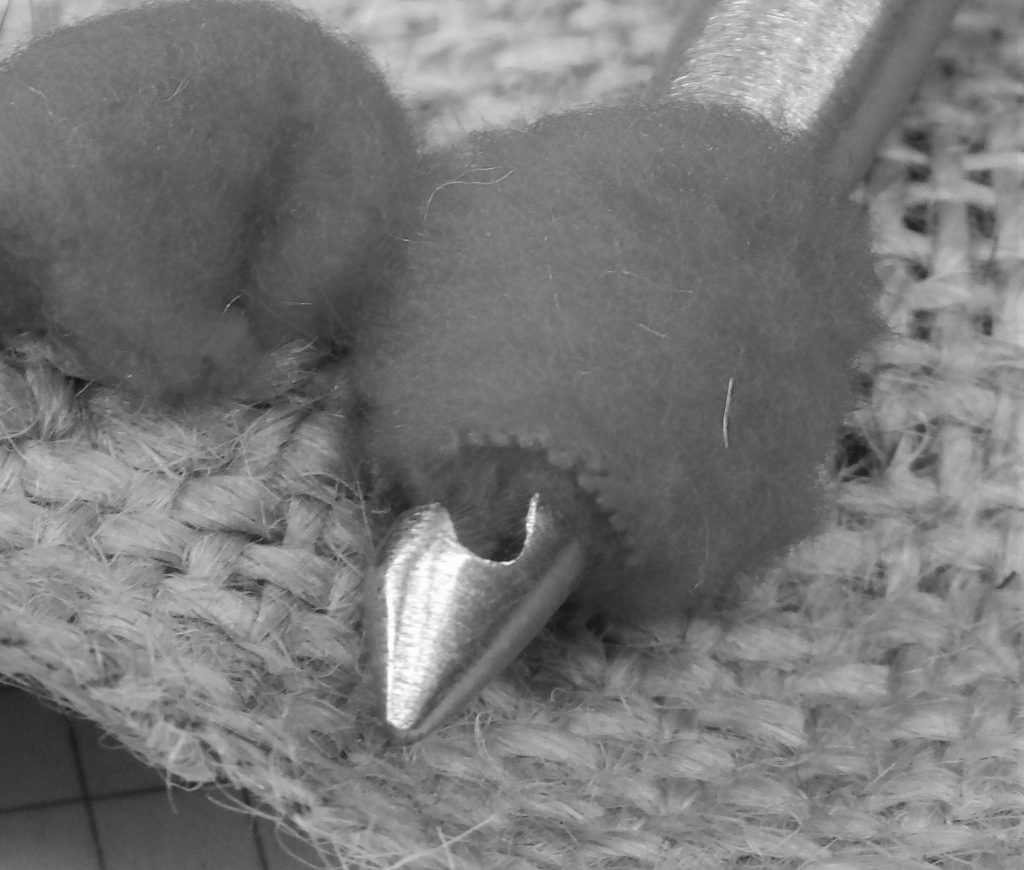
Then repeat the process, a couple of strands in the hessian along, and keep repeating until you get to the end of the strip. The loops can be as tall as you like, within reason, according to the effect you want to achieve.
To finish a length of cloth pull the loose end up through the backcloth next to the last loop and do the same with the loose end at the start of the strip. To add a new strip simply work in the same way starting where you left off the first strip. Leave about 50mm [2”] on each side of the backcloth for a hem.
When the backcloth is full fold the hem underneath and sew, tape or glue it in place.
As pulling one loop affects the loops next to it it’s usual to back hooked rugs with another piece of hessian to make the strips more secure in the backcloth. Again the edges will need to be hemmed, this time with the hemmed side against the back of the rug to make a neat finish. The usual way to attach the backing is by sewing with strong cotton thread, or carpet thread. An alternative is to paint the back with latex glue [or other flexible glue].
Handy tips
It’s quite common, though far from essential, to hold the backcloth on a rug making frame when making hooked rugs. The advantage is it keeps both hands free so one hand can concentrate on holding the strip underneath and the other can concentrate on working the hook. The disadvantage is the frame makes it less portable and make it harder to work comfortably in your lap.
Rag rug hooking lends itself to making pictures or patterns. Drawing the picture first with tailor’s chalk will give you an outline to fill in.
It’s possible to pull long loops and then cut them, with scissors, to create a shaggy rag rug. This is quite laborious, though, and leaves two pieces of cloth in the same hole as the backcloth and as cloth against cloth rarely grips as well as against hessian this make the pieces less secure than in a traditionally made shaggy rag rug.
This tool is based on an old idea. The original was called a ‘Catch it’ tool to make a ‘Catch it rug’ – best be careful how you say it.
Rugs made using the spider are less thick than the shaggy ones, made using a rugger, and less detailed than hooked rugs. There are advantages with the spider, though it’s very quick to make a rug; the cloth is absolutely secure even if the backcloth isn’t filled but it’s also very easy to undo work if you’re not satisfied with it. Like most other rag rug making methods, the spider is usually used to work material into a hessian backcloth.
The spider is a bit fussier about material but, basically, it can work with anything that will slide through the holes and won’t fall apart when it’s cut into 12mm to 20mm strips, depending on it’s thickness. Cotton jersey, particularly old T shirts, suit it best but it can cope with quite a wide range of materials.
First thread a long strip of cloth into the spider; the strip should be 12mm to 20mm wide (narrow if it’s thick or wide if it’s thin) the length doesn’t matter but the longer it is the better.
Push one end of the cloth strip through the hole nearest the spider’s handle, working from the convex side to the concave side. Pull the strip along the groove, towards the tip, and push it through the hole working from the concave side to the convex side. Pull it through until the end reaches back to halfway along the wooden handle and it’s ready to go.
Wiggle the tip of the threaded spider through the backcloth, working from the underneath towards the top, and push it right through. Tip: the spider’s quite wide, to push through hessian, so one or two strands might catch over the tip just sweep them off with your finger; the tip’s rounded so that your finger won’t come any harm. When the business end of the spider’s pushed all the way through it’ll take a loop, from the strip of cloth, with it hang on to this loop by pushing the index finger of your spare hand through it.
Pull the spider back, out of the hessian, and push it through again a few strands away; as the tip comes through the backcloth drop the loop, in your spare hand, over it. Push the spider right through again and you should have the first link of chain. Just keep going always pushing the new loop through the previous one. Tip: the secret of using the spider is to allow yourself a bit of slack, in the cloth strip, and always hang on to a generous loop otherwise the work tends to become very tight.
When you come to the end of the strip of cloth leave the end dangling free underneath the backcloth and thread the spider with a new strip. Carry on looping through where you left off and you’ll find you have two loose ends underneath, right next to each other tie these together with a reef knot and trim any excess from the ends.
All the links of the chain will be absolutely secure except the last one û therefore, when you finish, it’s vital to tie off the last end. If, on the other hand, you’re not satisfied with the work you’ve done, at any time, you can pull the end left from the last week you’ve made and the whole lot will pull out, one link at a time like unravelling knitting.
All that’s left to worry about is the hem of the backcloth; obviously something has to be done to stop it fraying. Folding the edge in and working through both layers, as with using the rugger, doesn’t work so well with the spider it’ll go, without too much difficulty, through two layers but where there’s four layers, on the corners, there’s no chance. The usual answer is to leave a hem, about 50mm wide and turn it underneath afterwards where it can be sewn, or glued, in place. An interesting alternative, though, is to finish the edge using a rugger. This, of course, takes up the hem as it goes the result is a rug which is mostly quite flat but has a shaggy border all around it; the effect is like having a rug in a frame.
Because it secures the cloth strip to the backcloth the spider can be used on any type of backcloth that takes your fancy, including loosely knitted material it’s one of those things that are worth experimenting with.
Handy link: How to use the spider tool